

Android 개발자가 간단한 로컬 서버로 FCM 테스트해보기에 대해서 다룹니다.
들어가기 앞서
이번에 FCM을 테스트하기 위해서 간단하게 Kotlin-Spring boot를 사용하여 서버를 구축한 뒤, 어떤 방식으로 FCM이 동작되는지 테스트해보았습니다.
필요한 요구사항은 다음과 같습니다!
- Android Studio
- Spring Boot with Kotlin
- FCM
- Postman
FCM
message format
FCM 에서 메시지를 보내기 위한 메시지 포맷은 다음과 같습니다.
- data
- notification
- android
- webpush
- apns
- token
- topic
- condition
자세한 내용은 파이어베이스 공식 문서를 참고할 수 있습니다.
Spring Boot with Kotlin
FCM 기초세팅
FCM 메시지를 보내기 위한 API의 URL를 생성하는데, 여기서 주의해야할 점은 프로젝트의 이름을 정확하게 적어주어야 합니다. KOIN 에서 사용되는 Firebase 프로젝트는 아래와 같이 kap-chat을 사용합니다.
const val API_URL = "https://fcm.googleapis.com/v1/projects/kap-chat/messages:send"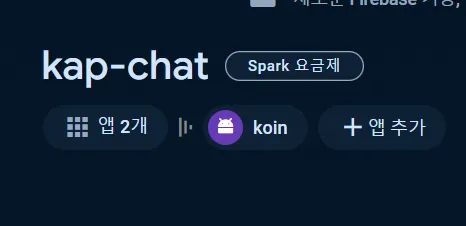
그 다음으로는 Google Cloud 의 인증 시스템을 위한 액세스 토큰을 얻어야 합니다.
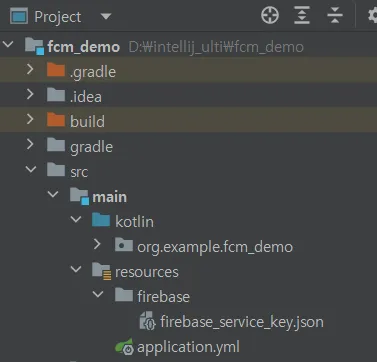
Firebase 서비스 키 파일의 경로를 firebaseConfigPath 변수에 정의합니다. (저 같은 경우에는 resources/firebase 경로에 저장했습니다.)
private fun getAccessToken(): String {
    val firebaseConfigPath = "firebase/firebase_service_key.json"
    val credentials = GoogleCredentials
        .fromStream(ClassPathResource(firebaseConfigPath).inputStream)
        .createScoped(listOf("https://www.googleapis.com/auth/cloud-platform"))
    credentials.refreshIfExpired()
    return credentials.accessToken.tokenValue
}
서비스 키 파일은 프로젝트 설정 / 서비스 계정에서 새 비공개 키 설정을 누르면 얻을 수 있습니다.
FCM message
FCM을 사용하여 메시지를 만들고 해당 메시지 만들고 JSON 형식의 문자열로 변환하는 것이 필요합니다. 이유는 FCM에게 RequestBody로 요청을 보내기 위함입니다.
(*FCM 메시지 정보는 파이어 공식 문서를 참조해주세요)
FCM 메시지의 기본 포맷은 다음과 같습니다.
{
  "message":{
    "token":"bk3RNwTe3H0:CI2k_HHwgIpoDKCIZvvDMExUdFQ3P1...",
    "notification":{
      "title":"Portugal vs. Denmark",
      "body":"great match!"
    },
    "data" : {
      "Nick" : "Mario",
      "Room" : "PortugalVSDenmark"
    }
  }
}
위와 같이 메시지 포맷을 아래의 data class를 사용하여 나타낼 수 있습니다.
data class FcmMessage(
    val validate_only: Boolean = false,
    val message: Message
)

data class Message(
    val notification: Notification,
    val data: Map<String,String>,
    val token: String,
)
data class Notification(
    val title: String,
    val body: String,
)
그 다음 메시지를 만들기 위해서 기존 FCM API를 사용하지 않고 자체적인 data class로 간단하게 정의할 수 있습니다.
private fun makeMessage(targetToken: String, title: String, body: String): String {
    val notification = Notification(title = title, body = body)
    val data = mapOf("data_title" to "title", "data_type" to "type")
    val message = Message(notification = notification, data = data, token = targetToken)
    return objectMapper.writeValueAsString(FcmMessage(message = message))
}
FCM 요청하기
이제 기본적인 세팅을 끝내고 makeMessage 로 JSON 문자열을 받아옵니다. 해당 문자열을 Request Body에 담아서 FCM 메시지를 보내기 위한 API Request를 만듭니다.
 fun sendDirectTo(targetToken: String, title: String, body: String) {
    val message = makeMessage(targetToken, title, body)

    val client = OkHttpClient()
    val requestBody = message
        .toRequestBody("application/json; charset=utf-8".toMediaType())
    val request = Request.Builder()
        .url(API_URL)
        .post(requestBody)
        .addHeader("Authorization", "Bearer ${getAccessToken()}")
        .build()
    val response = client.newCall(request).execute()
}
만든 API Request는 Controller 클래스를 만들어서 HTTP POST 요청을 보내게 됩니다.
(*해당 요청은 Postman을 사용해서 테스트해볼 수 있습니다. 그전에 targetToken은 안드로이드 Device Token을 알아야하기 때문에 그거 먼저 알아보겠습니다.)
@RestController
class FcmController(
    private val firebaseCloudMessageService: FirebaseCloudMessageService,
) {
    @PostMapping("/send")
    fun send(@RequestBody messageDto: MessageDto): MessageDto {
        firebaseCloudMessageService.sendDirectTo(
            messageDto.targetToken,
            messageDto.title,
            messageDto.body
        )
        return messageDto
    }
}
이제는 안드로이드에서 FCM 메시지를 수신하고, Postman 에서 HTTP POST 요청을 보내는 방법에 대해서 알아보겠습니다.
Android
FCM 기초세팅
Android 에서도 FCM 기초세팅이 필요합니다.
기초세팅 요구사항
- google-services.json 파일 app 모듈에 넣기
- firebase-messaging 종속성 추가
FirebaseMessagingService()상속한 클래스 생성- manifest service 구성 추가하기
- Device Token 얻기
Android 기초세팅 관련해서는 KOIN 깃허브 링크와 파이어베이스 공식 문서를 참조해주세요.
토큰 얻기
Firebase API를 사용하여 Android 핸드폰의 디바이스 토큰을 얻을 수 있습니다. 해당 타겟으로 토큰이 등록된 디바이스에게 FCM은 메시지를 보낼 수 있게 됩니다.
FirebaseMessaging.getInstance().token.addOnCompleteListener { task ->
    if (!task.isSuccessful) {}
    val token = task.result
    Log.e("device_token", "token : $token")
}
FCM 메시지 수신
FCM 메시지를 FirebaseMessagingService API를 사용하여 메시지를 수신할 수 있습니다.
class KoinFirebaseMessagingService : FirebaseMessagingService() {
    override fun onMessageReceived(message: RemoteMessage) {
        super.onMessageReceived(message)
        message.data.let { data ->
            if (data.isNotEmpty()) {
                Log.e("fcm_data", "notEmpty message.data : $data")
            }
        }

        message.notification?.let { notification ->
            notification.title
            notification.body
            notification.clickAction
        }
    }

    override fun onNewToken(token: String) {
        super.onNewToken(token)
    }
}FCM 메시지를 수신하는 방법은 공식문서에서는 다음과 같이 설명합니다.
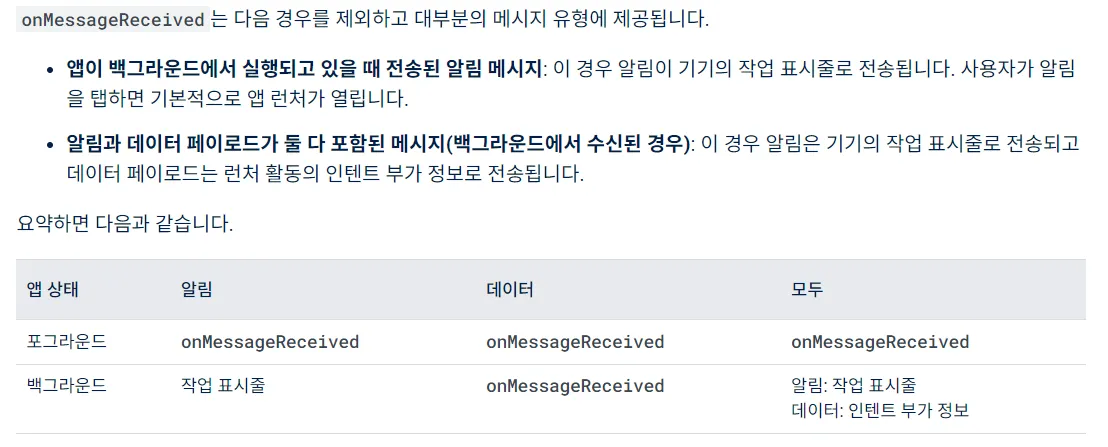
음.. 한국어 보다는 영어로 확인해보겠습니다.
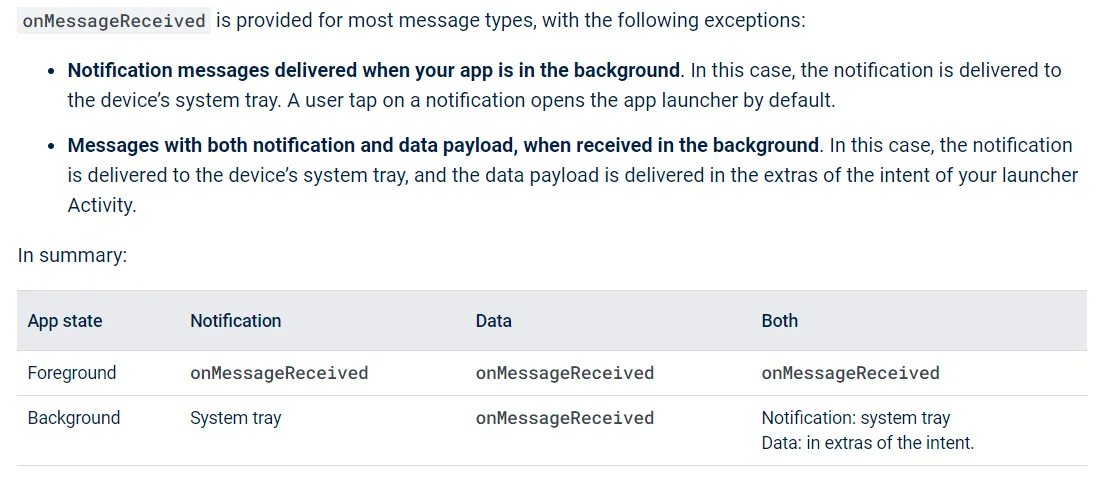
살펴보면, 포그라운드 서비스 일 때는 앱이 실행되고 있을 때 Notification 과 Data 에 대한 페이로드를 수신합니다. 하지만 백그라운드 서비스 일 때는 Notification 에 대한 페이로는 System tray 로 빠지고 Data에 대한 페이로드만 수신합니다.
다음과 같이 해석할 수 있습니다.
-
앱이 포그라운드 상태일 때
- Notification & Data 페이로드 송신
- onMessageReceived 수신
- Notification & Data 페이로드 송신
-
앱이 백그라운드 상태일 때
- Notification & Data 페이로드 송신
- onMessageReceived 수신 못함
- Data 페이로드 송신
- onMessageReceived 수신
- Notification & Data 페이로드 송신
문제는 백그라운드 상태일 때입니다. 앱이 백그라운드 상태이며 Notification & Data 페이로드를 수신하지 못합니다. 그 이유는 Notification 은 System tray 에서 동작하며 Firebase 에서 기본으로 제공하는 알림을 사용하게 됩니다. 즉, 클릭을 하더라도 아래와 같은 Intent-filter가 적용된 페이지로 이동하게 됩니다.
<activity
    android:name=".ui.splash.SplashActivity"
    android:exported="true"
    <intent-filter>
        <action android:name="android.intent.action.MAIN"/>
        <action android:name="android.intent.action.VIEW"/>

        <category android:name="android.intent.category.LAUNCHER"/>
    </intent-filter>
</activity>
그렇다면 아래와 같이 의문점 3가지가 생깁니다.
- 앱이 백그라운드에 있을 때, message를 받을 수 있나?
- 기존에는 Firebase가 제공하는 알림을 사용하는데, 알림을 커스텀할 수 없나?
- 기존 Firebase 에서 제공하는 알림을 사용할 때, 알림을 클릭했을 때 원하는 View로 이동할 수 없나?
앱이 백그라운드에 있을 때, message를 받을 수 있나?
message를 받을 수 있습니다. 하지만 기존 방법으로 사용하면 message를 받을 수 없을 겁니다.
여기서 중요한 포인트는 서버에서 보내주는 message format를 잘 봐야합니다.
기존 message format 은 다음과 같습니다.
{
    "notification": {
        "title" : "koin title",
        "body" : "koin body"
    },
    "data" : {
        "koin_title" : "koin data title",
        "koin_body" : "koin data body"
    }
}
Android에서는 FCM으로부터 message를 수신할 때, 백그라운드에서 수신하는 경우와 기존 Firebase message format에 맞게 처리되는 과정이 있습니다.
이 부분은 FCM 공식문서를 참조하면 더 자세히 이해할 수 있습니다.
즉, 위와같은 message format으로 서버로부터 FCM이 도착한다면 백그라운드에서는 아쉽게도 데이터를 받을 수 없습니다.
그렇다면 어떻게 해결해야할까요?
정답은 notification field를 제거하는 것입니다. notification field를 제거함으로써, data field가 주 FCM 메시지 헨들링 message format이 됩니다. 이는 적절하게 사용한다면 2번에서 질문한 기존에는 Firebase가 제공하는 알림을 사용하는데, 알림을 커스텀할 수 없나? 에 대한 답변이 됩니다.
백그라운드에서 수집할 수 있는 message format은 다음과 같습니다.
{
    "data" : {
        "koin_title" : "koin data title",
        "koin_body" : "koin data body"
    }
}
Android 에서는 아래와 같이 message 를 수신할 수 있습니다.
message.data.let { data ->
    if (data.isNotEmpty()) {
       data
    }
}
기존에는 Firebase가 제공하는 알림을 사용하는데, 알림을 커스텀할 수 없나?
가능합니다. 기존 Firebase 알림을 사용하지 않고도 커스텀한 알림을 제작할 수 있습니다. 기존 Notification Builder를 사용하여 알림을 제작하고 Channel(API 26) 를 만들면 됩니다.
간단합니다. 위에서 언급한 message format 중 notification field를 제거하고 data field를 사용하여 해당 data field 속성을 적절하게 사용하면됩니다.
해당 부분은 서버와의 message formatting을 더 긴밀하게 해야할 것 같습니다.
기존 Firebase 에서 제공하는 알림을 사용할 때, 알림을 클릭했을 때 원하는 View로 이동할 수 없나?
가능합니다. 해당 부분은 Android message format임을 알려드립니다.
FCM message format 중 android field가 존재합니다.
해당 field에는 다양한 속성들이 존재하는데, 이 중에서 clickAction 속성이 바로 기존 Firebase 알림을 클릭했을 때 발생하는 이벤트 속성입니다.
기존에는 아래와 같이 Main으로 이동하게 됩니다.
<intent-filter>
  <action android:name="android.intent.action.MAIN"/>
  <action android:name="android.intent.action.VIEW"/>

  <category android:name="android.intent.category.LAUNCHER"/>
</intent-filter>
하지만 이를 적절하게 사용한다면, 가고싶은 View로 이동하는 Action을 원하는 알림에 넣을 수 있습니다.
만약에 로그인을 하라는 알림이 도착했고, 로그인 페이지로 이동하는 과정을 설명하겠습니다.
우선 message format은 다음과 같이 진행됩니다.
"android" : {
    "title" : "koin_android_title",
    "body" : "koin_android_body",
    "click_action" : "LOGIN_ACTIVITY"
}
click_action의 속성 값은 현재 LOGIN_ACTIVITY로 진행했지만 협업 시 알림 명세를 진행하여 통일성을 맞출 수 있을 것 같습니다.(협업하면, apns, webpush 와 같이 iOS와 Web에도 알림을 보낼 수 있기 때문입니다.)
우선 LOGIN_ACTIVITY라는 click_action 을 FCM으로 요청을 보내어 해당 FCM은 Android에게 message를 보내게 됩니다.
다음과 같이 message를 받을 수 있습니다.
앱이 켜졌을 때입니다. 다시 리마인드 해보면 notification field 가 아닌 data field 만! 보내야 android 에서 background 작업이 가능해집니다.
message.notification?.let { notification ->
    notification.title
    notification.body
    notification.clickAction
}
그렇다면 click_action을 어디서 처리해야하나요?
해당 부분은 기존에 click_action을 manifest 에서 처리한 것과 같이 manifest에서 처리할 수 있습니다.
<activity
    android:name=".ui.login.LoginActivity"
    android:exported="false"
    <intent-filter>
      <action android:name="LOGIN_ACTIVITY"/>
      <category android:name="android.intent.category.DEFAULT"/>
    </intent-filter>
</acitivity>
위와 같이 처리되면, 기존 Firebase 에서 제공하는 알림을 클릭했을 때, 해당 알림의 message format으로 android field 속성 중 click_action 값이 LOGIN_ACTIVITY 일 때 로그인 페이지로 이동함을 알 수 있습니다.
테스트 with Postman
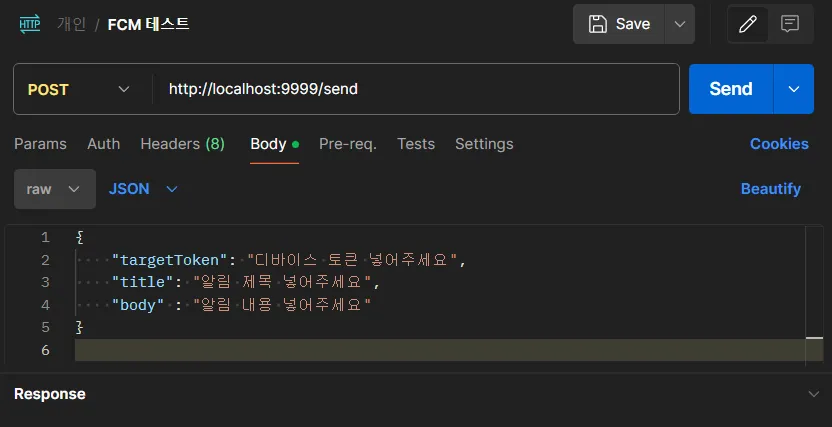
HTTP Request 만들기
Postman 에서 서버에 요청할 Reuqest를 만듭니다.
- 디바이스 토큰은 Android getToken 으로부터 받습니다.
- 제목과 내용은 원하는 대로 작성해주면 됩니다.
본격적인 테스트
테스트에 대한 전체적인 플로우는 다음과 같습니다.
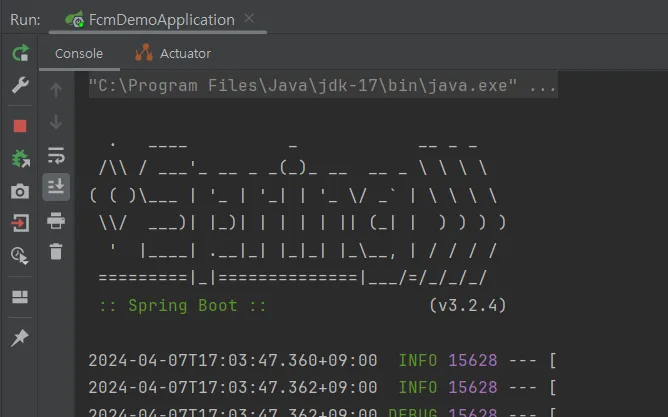
-
처음에 진행되었던, 로컬 서버를 실행합니다.
-
안드로이드 디바이스 토큰을 발행합니다.
FirebaseMessaging.getInstance().token.addOnCompleteListener { task ->
    if (!task.isSuccessful) {}
    val token = task.result
    Log.e("device_token", "token : $token")
}- Postman 을 사용해서 HTTP POST 요청을 보냅니다.
- 안드로이드에서 FCM 메시지를 수신합니다.
class KoinFirebaseMessagingService : FirebaseMessagingService() {
    override fun onMessageReceived(message: RemoteMessage) {
        super.onMessageReceived(message)
    }
}
안드로이드 FCM 메시지 수신 테스트
일반적인 테스트
-
message format
{ "notification" : { "title" : "koin title", "body" : "koin body" }, "data" : { "koin_title" : "koin data title", "koin_body" : "koin data body" } } -
kotlin spring code
data class FcmMessage(
    val validate_only: Boolean = false,
    val message: Message
)

data class Message(
    val notification: Notification,
    val data: Map<String,String>,
    val token: String,
)

data class Notification(
    val title: String,
    val body: String,
)
val notification = Notification(title = title, body = body) val data = mapOf("koin_title" to "koin data title", "koin_body" to "koin data body") val message = Message(token = targetToken, notification = notification, data = data) -
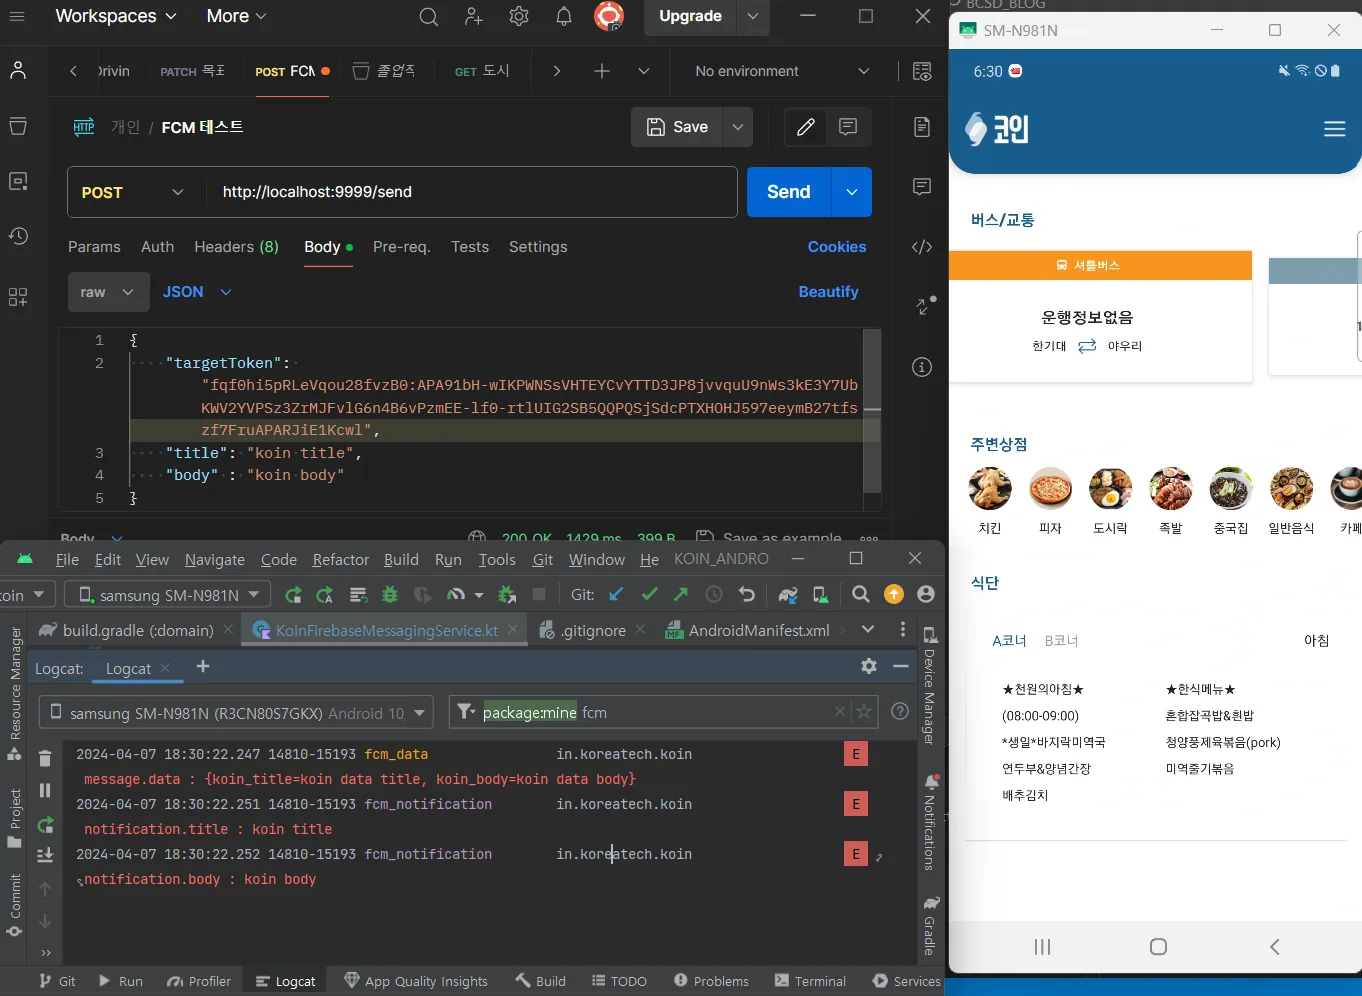
앱이 포그라운드 상태일 때 메시지 수신
-
앱이 백그라운드 상태일 때 메시지 미수신
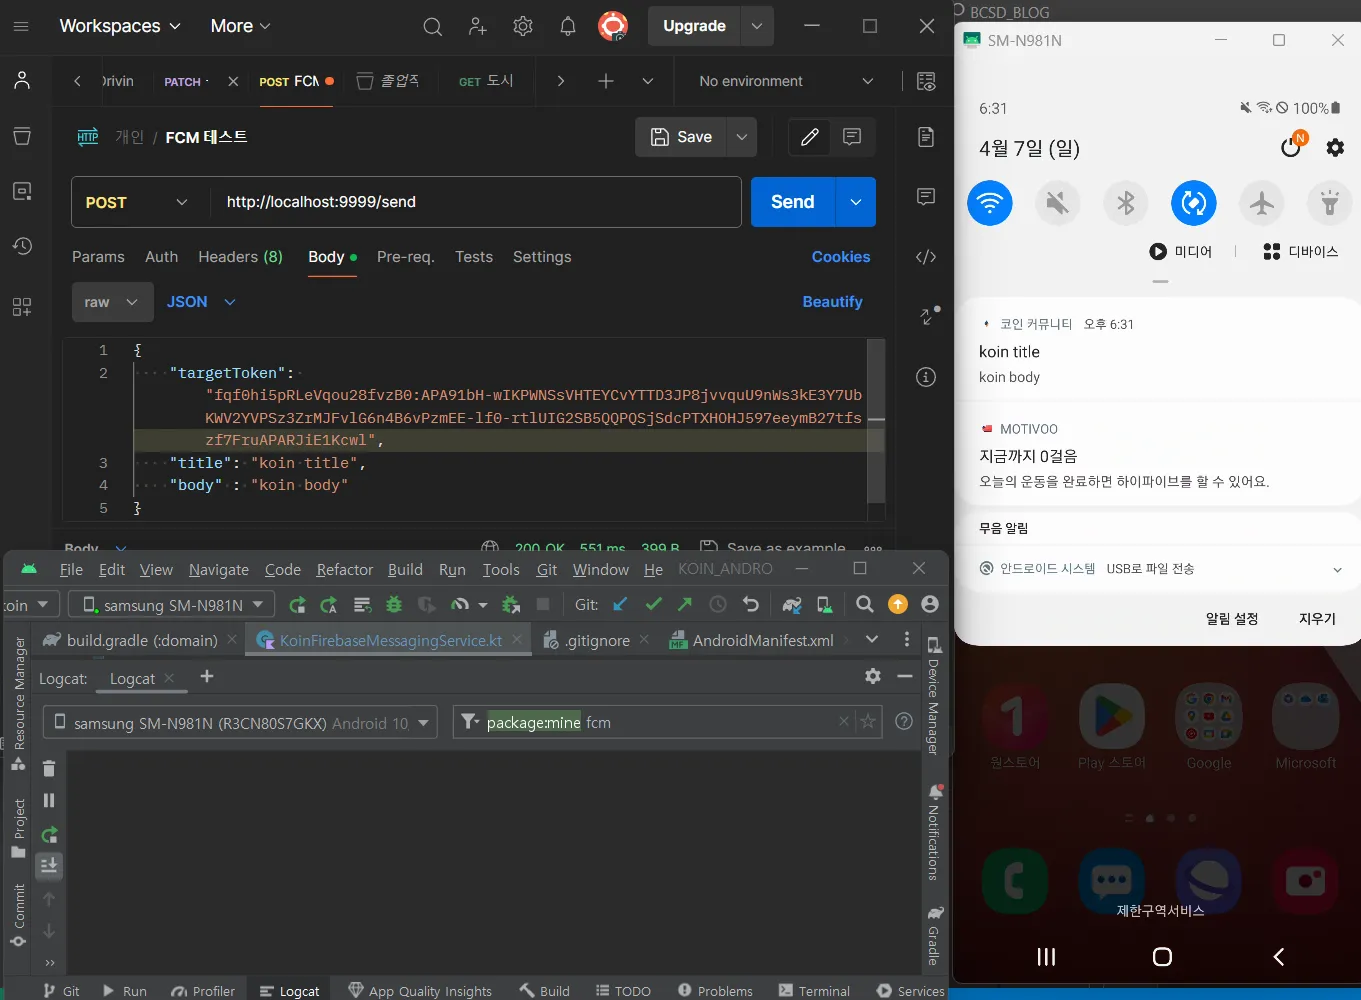
위에서 사진으로 보면 포그라운드 상태에서는 메시지를 수신합니다. 하지만 백그라운드 상태에서는 알림창만 뜨고 메시지를 수신할 수 없습니다. 알림 클릭 시, Main-Launcher로 이동함을 알 수 있습니다.
<activity
    android:name=".ui.splash.SplashActivity"
    android:exported="true"
    <intent-filter>
        <action android:name="android.intent.action.MAIN"/>
        <action android:name="android.intent.action.VIEW"/>

        <category android:name="android.intent.category.LAUNCHER"/>
    </intent-filter>
</activity>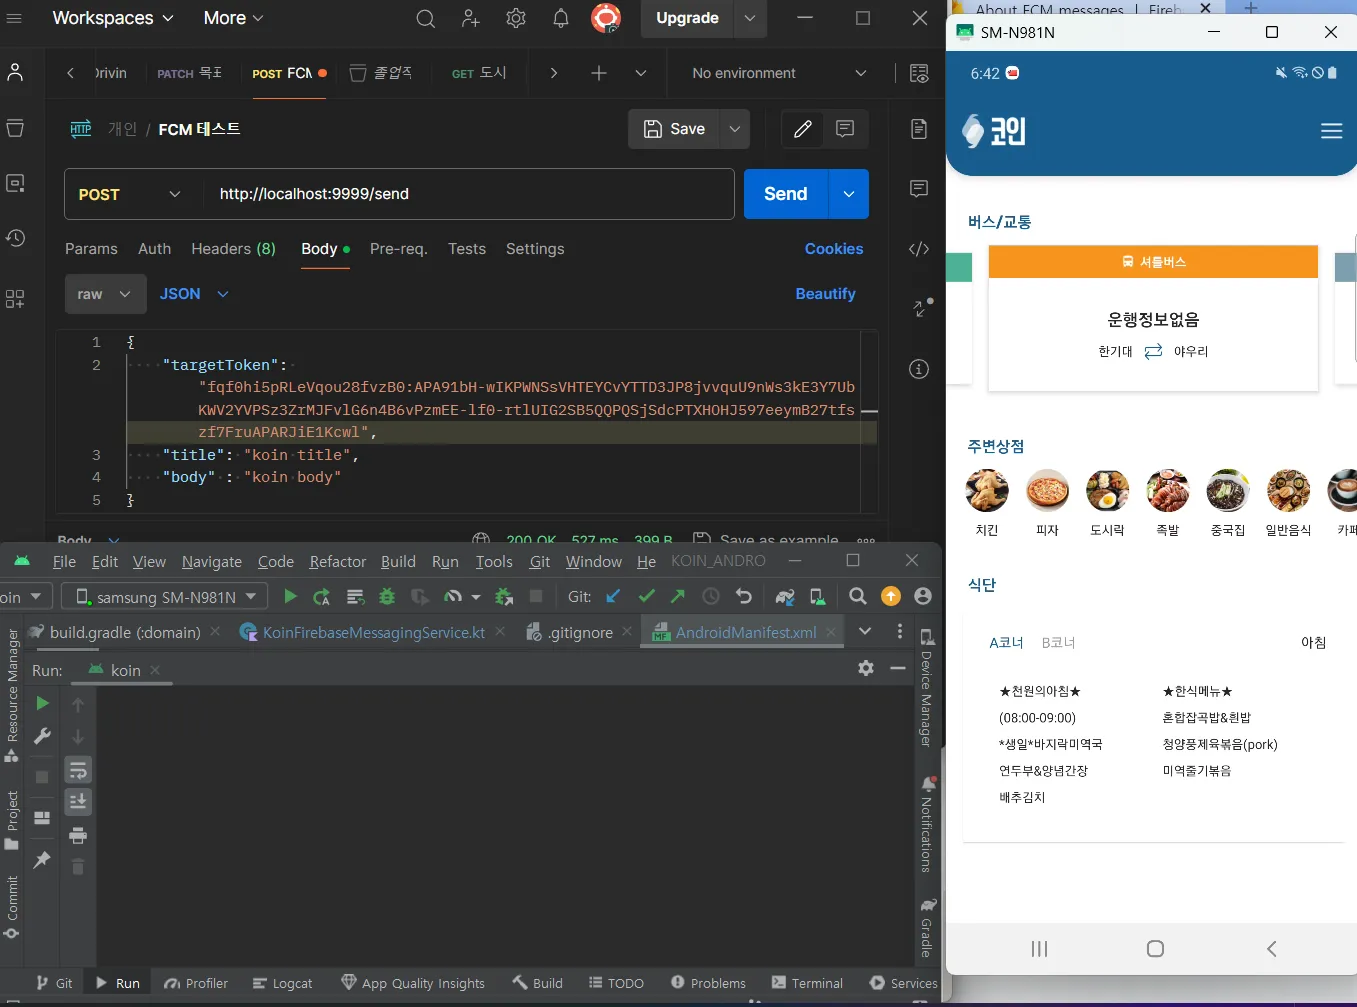
알림 클릭 액션 테스트
-
message format
{ "notification" : { "title" : "koin title", "body" : "koin body" }, "data" : { "koin_title" : "koin data title", "koin_body" : "koin data body" }, "android" : { "click_action" : "LOGIN_ACTIVITY" } } -
kotlin spring code
data class FcmMessage(
    val validate_only: Boolean = false,
    val message: Message
)

data class Message(
    val notification: Notification,
    val data: Map<String,String>,
    val android: Android,
    val token: String,
)

data class Notification(
    val title: String,
    val body: String,
)

data class Android(
    val notification: AndroidNotification
)

data class AndroidNotification(
    val click_action: String
)
val notification = Notification(title = title, body = body) val data = mapOf("koin_title" to "koin data title", "koin_body" to "koin data body") val android = Android(org.example.fcm_demo.AndroidNotification("LOGIN_ACTIVITY")) val message = Message(token = targetToken, notification = notification, data = data, android = android) -
앱이 포그라운드 상태일 때 메시지 수신
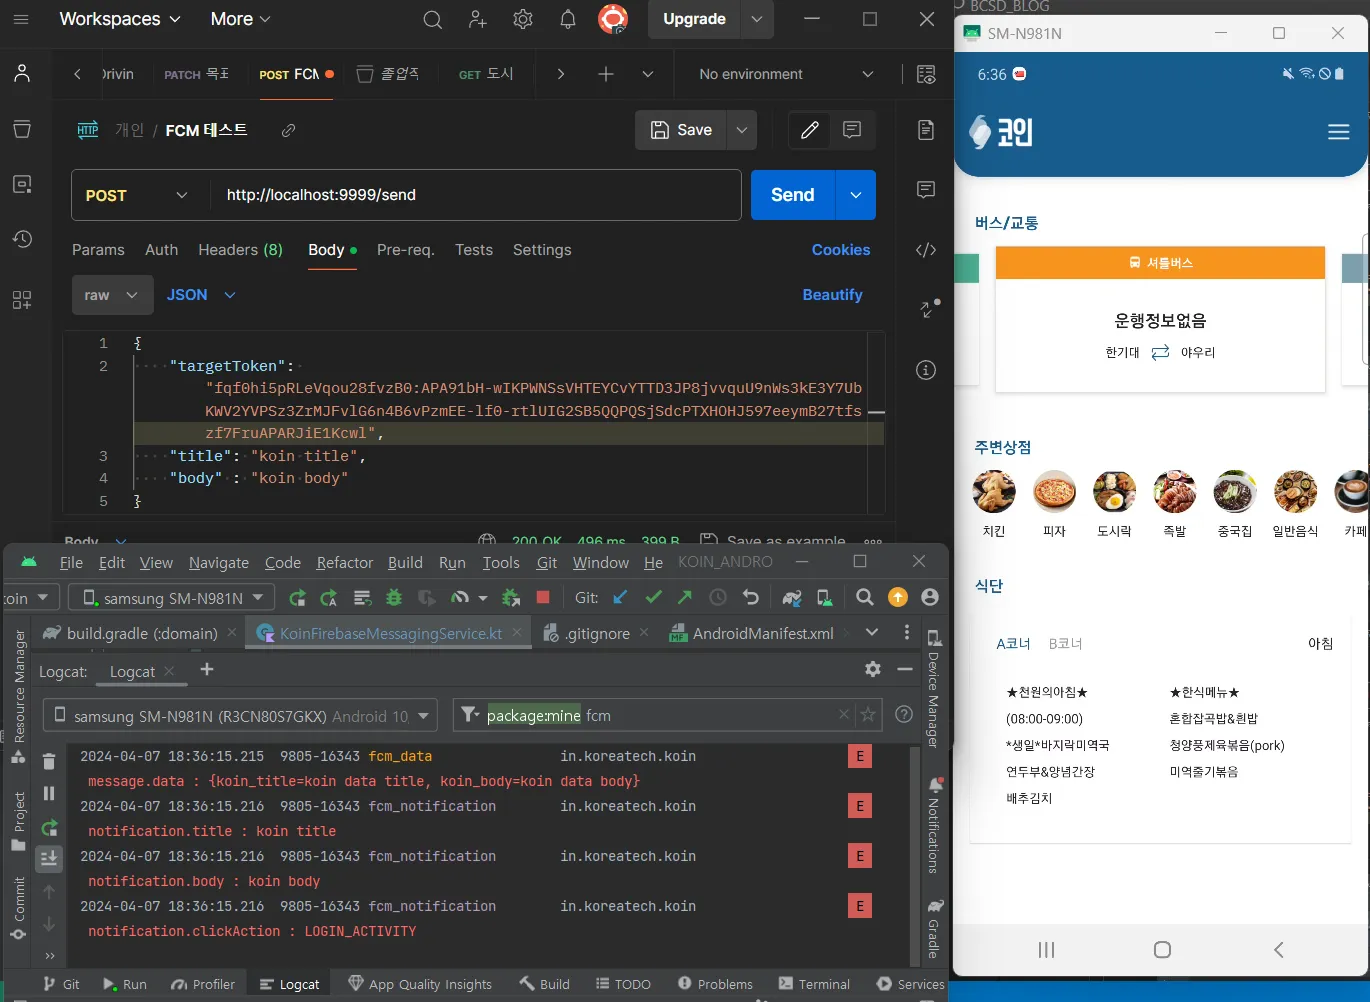
위에서 사진으로 보면 포그라운드 상태에서는 메시지를 수신한다. 하지만 백그라운드 상태에서는 알림창만 뜨고 메시지를 수신할 수 없습니다. 첫 번째 테스트와 같은 매커니즘입니다. 하지만 알림을 클릭했을 때는 다릅니다. 원하는 클릭 액션 속성을 설정함으로써 원하는 Activity로 이동할 수 있습니다.
<activity
    android:name=".ui.login.LoginActivity"
    android:exported="false"
    <intent-filter>
        <action android:name="LOGIN_ACTIVITY"/>
        <category android:name="android.intent.category.DEFAULT"/>
    </intent-filter>
</activity>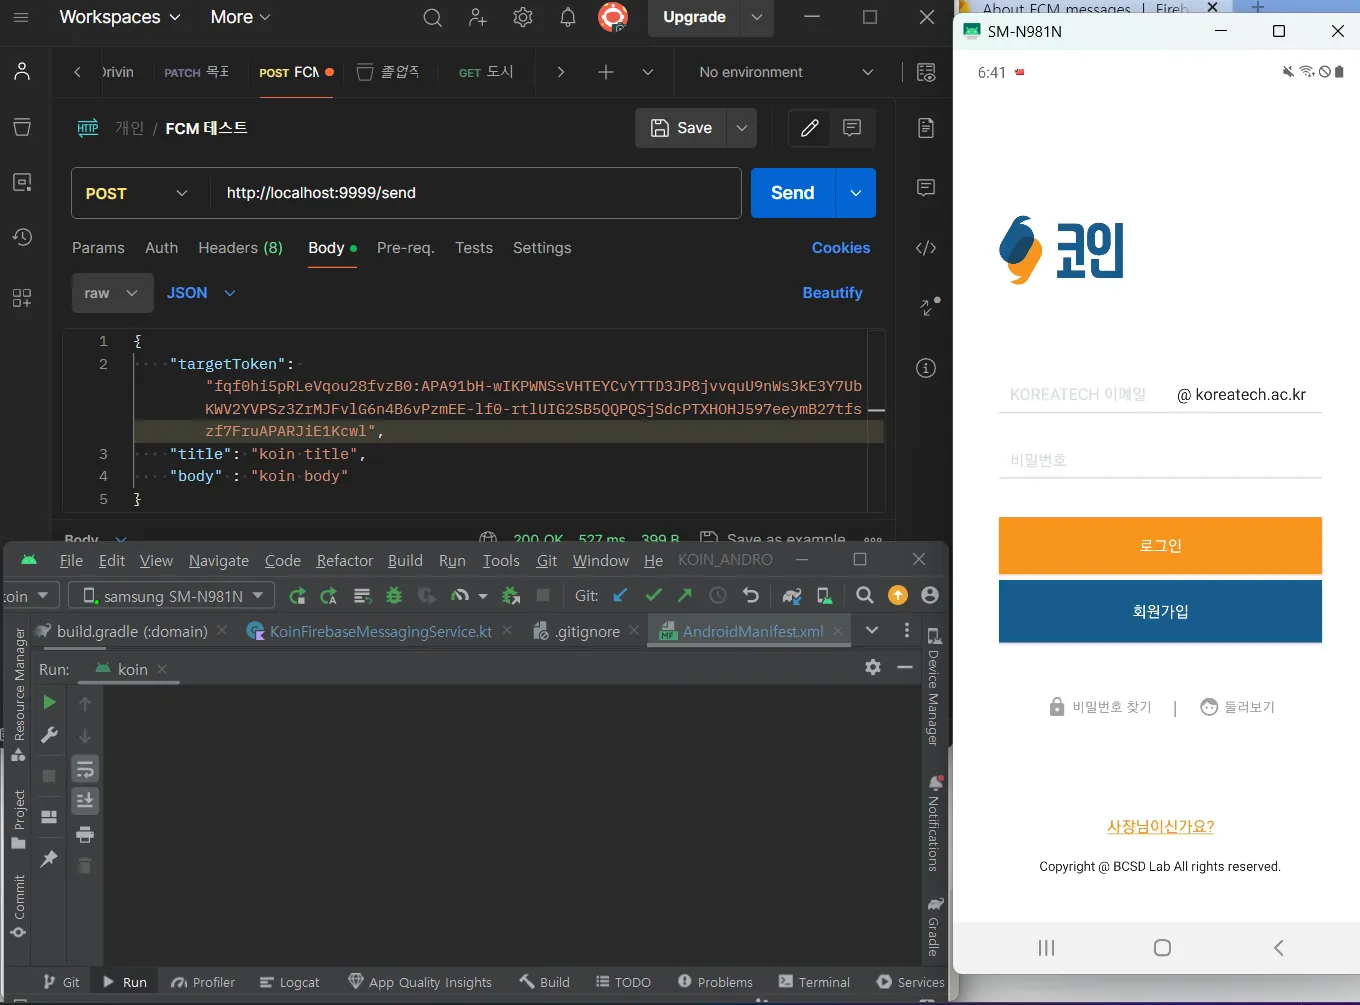
백그라운드 메시지 수신 테스트
-
message format
{ "data" : { "koin_title" : "koin data title", "koin_body" : "koin data body" } } -
kotlin spring code
data class FcmMessage(
    val validate_only: Boolean = false,
    val message: Message
)

data class Message(
    val data: Map<String,String>,
    val token: String,
)
val data = mapOf("koin_title" to "koin data title", "koin_body" to "koin data body") val message = Message(token = targetToken, data = data) -
앱이 백그라운드 상태일 때 메시시 수신
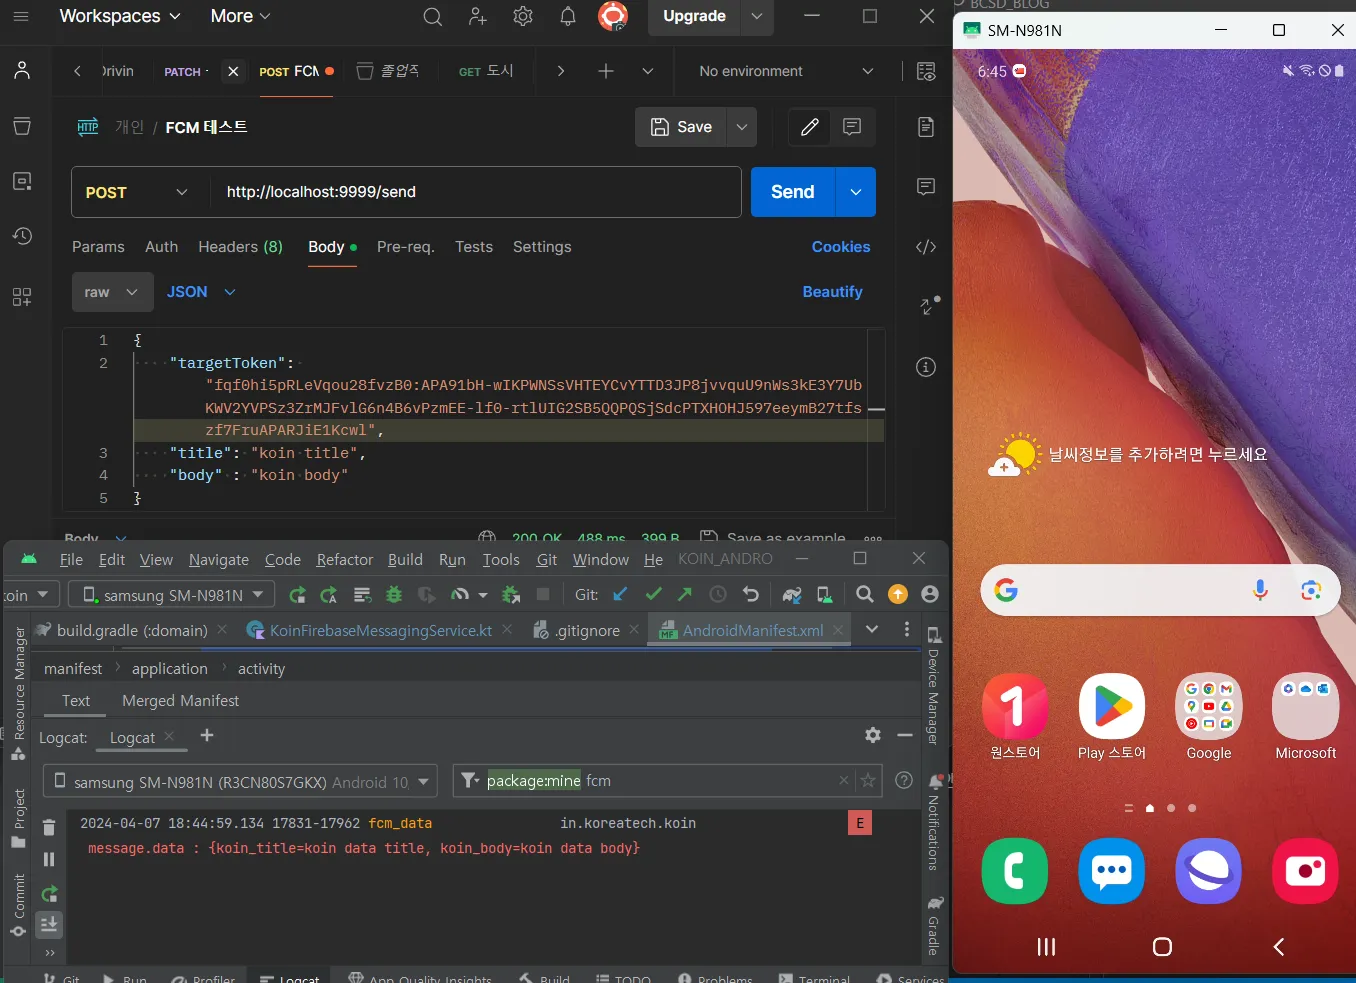
사진처럼 앱이 백그라운드 상태일 때, data 페이로드가 잘 수신되는 것을 알 수 있습니다. 하지만 알림창은 뜨지 않습니다. 즉, 원하는 알림창을 커스텀하게 제작할 수 있습니다.
알림 기능 명세
“코인”에서는 알림 기능 명세를 다음과 같이 표로 나타내어 진행할 예정입니다!
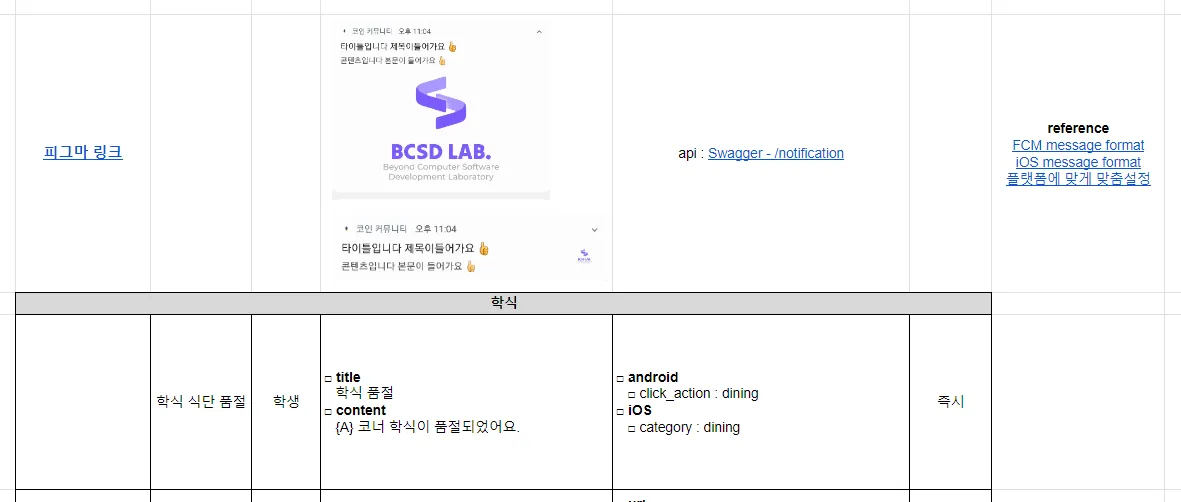
참조
-
Android FCM Code KOIN Github(branch
) 참조 -
Kotlin Spring Boot Code 개인 레포지토리 Github 참조
-
FCM server with Kotin Spring Boot 참조한 블로그
댓글
질문과 경험을 댓글로 나눠주세요. 댓글은 GitHub 계정으로 작성할 수 있습니다.